Vmware Player Tools Os X 10 Can't Start
Using virtual machines of VMware Player in Windows 10 has many advantages: For example, some old softwares can only be used in the old system, but does not work properly or are not compatible in the Windows 10 new system, in these cases users can use old softwares on the virtual machines of old systems in Windows 10. Another example is that some old hardwares' drivers can not be compatible with Windows 10 new system, also can use virtual machines of old systems in Windows 10 to load the drivers for old hardwares. Yes, anyway users can use virtual machines of VMware Player or Hyper-V to solve the issues that the latest drivers for old peripherals in Windows 10 would no longer have been provided by manufacturers, - these old peripherals should include printers, scanners, etc., but exclude video cards, network adapters cards, and so on. Here is an example of the actual demand: Also an example of the actual demand: In fact it is very simple for installing a VMware Player virtual machine in Windows 10, now I will practice it in here. I could install a virtual machin of VMware Player by following steps: 1.
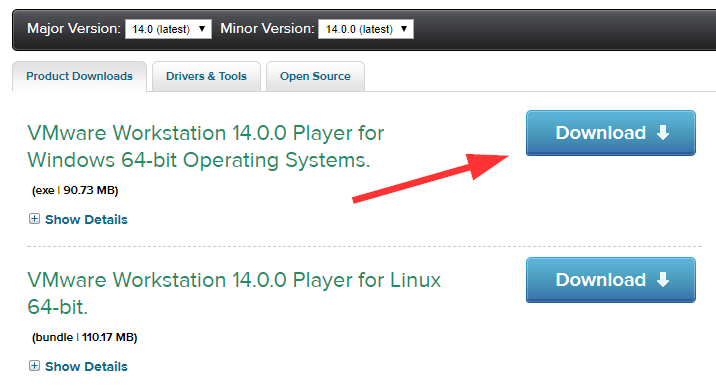
Download VMware Player. Open web browser and go to the following VMware Player official site: Click 'Try for free'. Beside 'VMware Workstation 12 Player for Windows 64-bit' click 'Download Now', then click 'Save'. Creates a new folder for VMware Player.
Movavi Video Editor for Mac is great Mac video editing software that will help you create awesome video clips, complete with music, fades, and special effects. Download for Free Mac OS X 10.7 or higher Buy Now Mac OS X 10.7 or higher I need a Windows version. Movavi’s movie maker for Mac has everything you need to create great home. Turn your videos into movie magic. With iMovie for iOS and macOS, you can enjoy your videos like never before. And it’s free. Just click to download and install on your Mac or iOS device. IMovie for Mac requires OS X El Capitan or later, 2GB of RAM (4GB recommended), an OpenCL-capable graphics card, and a display with 1280-by-800. Video maker mac free download - VideoPad Free Video Editor for Mac, Ephnic Movie Maker for Mac, Mac Video Downloader, and many more programs. Video making software for mac free download windows 7. Free video maker free download - Adobe Presenter Video Express, VideoPad Free Video Editor for Mac, YTD Video Downloader, and many more programs Navigation open search. Free Download – Animoto Video Maker for PC, Windows 7,8,10 and Mac. It helps you to create your own video clips and slideshows with simple and easy steps. Animoto Inc presents the new photography app Animoto Video Maker for you guys to use.
Supporting OS X on AMD CPUs Toggle Navigation Welcome, Bing [Bot] Profile; Notifications; Account settings. OS set macOS 10.13 with VM patch After VM start get a Boot Manager listing the SATA harddrive and SATA CDROM. Neither of the two options work. Did you install the VMWare tools from the Darwin.iso? If you feel I've helped you, feel.
Press Win+X, A, Alt+Y to open a Command Prompt (Adimin) window and run the following command in it: md 'E: Software Tools VirtualMachines VMware VMwarePlayer' 3. Install VMware Player.

Double-click the downloaded file VMware-player-12.1.0-3272444.exe to start the installation. The installation location is 'E: Software Tools VirtualMachines VMware VMwarePlayer'. The detailed installing processes and steps are omitted. Run VMware Player. In File Explorer, double-click 'E: Software Tools VirtualMachines VMware VMwarePlayer vmplayer.exe' Then type my email, and click [Continue] button. Some steps are omitted.
Then VMware Player is starting. Create Windows XP virtual machine in VMware Player. Put the Windows XP installation disc into the optical disc drive (my optical disc drive is F:).
In VMware Player, Click 'Create a New Virtual Machine', then 'New Virtual Machine Wizard' dialogbox pops up. On the 'Welcome to the New Virtual Machine Wizard' screen, under 'Install from:', click or ensure that the default 'Installer disc:' radio button is selected.
Then click [Next >] button. On the 'Easy Install Information' wizard, input Windows XP's product key, user full name, and password (can be empty).
Then click [Next >] button. On the 'Name the Virtual Machine' wizard, I name the virtual machine as 'Windows XP Professional', and then click [Browse.] button to select 'E: Software Tools VirtualMachines VMware VMwarePlayer Virtual Machines Windows XP Professional' as its stored location. Then click [Next >] button. On the 'Specify Disk Capacity' wizard, I type or select the Maximum disk size (GB): '40', click and select 'Store vitual disk as a single file' radio button. Then click [Next >] button. On the 'Ready to Create Virtual Machine' wizard, click [Customize Hardware.] button, then click 'USB Controller', click and ensure that the 'Show all USB input devices' checkbox is selected, then click [Close] button. Ensure that the 'Power on this virtual machine after creation' checkbox is selected.
Then click [Finish] button. Complete Windows XP installation. After finished Windows XP virtual machine creation, 'Windows XP Professional' virtual machine reveals in VMware Player, click and select it, then click 'Play Virtual Machine'. Now Windows XP installing process starts, then I could follow the instructions to continue. The detailed installing processes and steps are omitted. After finished Windows XP installation, click and select it then click 'Player' -> 'Power' -> 'Power On' to start it.
Do 'check for software updates', 'download all components including VMware Tools', 'install or reinstall VMware Tools'. Click 'Player' -> 'Help' -> 'Software Updates', then click [Check for Updates] button. Click 'Player' -> 'File' -> 'Preferences.' , then click [Download All Components Now] button. Click 'Player' -> 'Manage' -> 'Install VMware Tools.'
Or 'Reinstall VMware Tools.' , then follow the instructions to continue. Enable and set shared forlders. Click 'Player' -> 'Manage' -> 'Virtual Machine Settings.'